Scenario Builder with Open Application
Running Scenario Builder from
an open application allows you to calculate and save different scenarios,
and then select a scenario as the new mortgage. Up to 18 scenarios can
be saved per mortgage in the application. This help topic covers the following
topics:
Conditions to Access
Scenario Builder
Calculating the Scenarios
Saving the Scenarios
Running Comparisons of Scenarios
Setting a Scenario as
the Mortgage
Conditions
to Access Scenario Builder
For Scenario Builder to be accessed from an open application, the deal status must
be In Progress, Approved,
or Submitted.
If any one mortgage in an open application has any of the following
conditions, then Scenario Builder will
not be accessible:
- The mortgage has an accepted lender response
- The mortgage is an MCM (Multi-Component Mortgage)
- The mortgage is an interest-only mortgage
- The mortgage is a Secured LOC
- The mortgage is missing any of the following pieces of information:
- Mortgage Type (1st, 2nd or 3rd)
- Net Rate
- Payment Frequency
- Compounded Period
- Term
- Amortization
- Total Loan Amount.
Calculating
the Scenarios
Click Scenario Builder
from the Left
Navigation pane. The Scenario Builder page appears with details
automatically populated from the application.
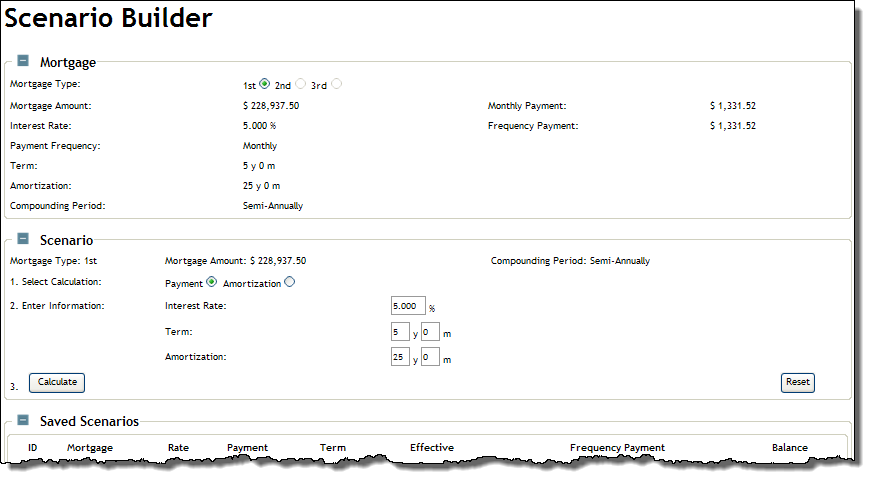
If there is more than one mortgage on the application, select
the option button (1st, 2nd, or 3rd)
of the mortgage you want to examine. The screen refreshes with the
details of the selected mortgage.
In the Scenario section,
select the calculation type: Payment
or Amortization.
If Payment was selected
in step 3, you can change the following information: Interest
Rate, Term, and Amortization. The monthly payment
will therefore be calculated.
or
If Amortization was selected
in step 3, you can change the following information: Interest
Rate, Term, and Monthly Payment.
Note: The Reset
button disregards any changes you have made to the fields and returns
the original values (i.e., the details in the Mortgage section on
the screen).
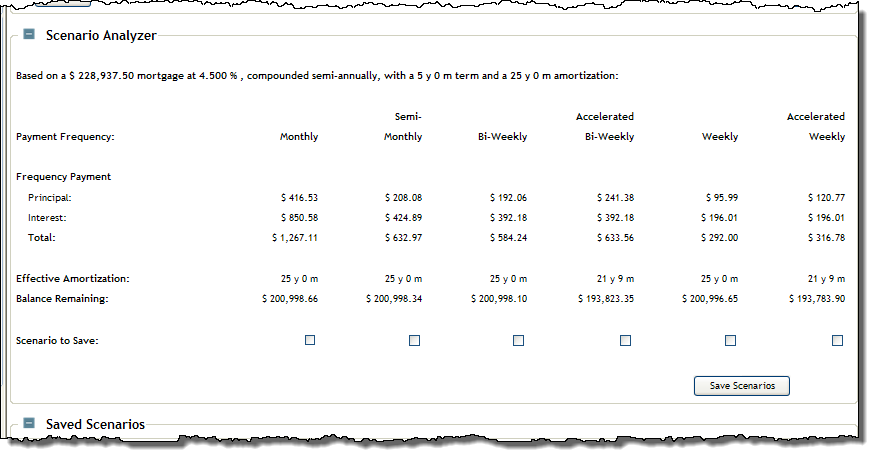
Click the Calculate
button. The screen refreshes with the Scenario
Analyzer section that displays the results of the following
six mortgage scenarios: Monthly,
Semi-Mothly, Bi-Weekly,
Accelerated Bi-Weekly, Weekly, and Accelerated
Weekly. (The screen shot below is based on the Payment
calculation type, as indicated in the explanation below the title).
Note: The compounded period
will be the same of the selected mortgage (in the Mortgage section
on screen).
Saving Scenarios
To save a scenario, select its Scenario
to Save checkbox in the Scenario Analyzer section, and then click
the Save Scenario button. The
screen refreshes and the Saved Scenarios section displays the recently
saved scenario(s). Expert allows up to 18 scenarios to be saved. Therefore
if the limit has been reached, an error message will appear.
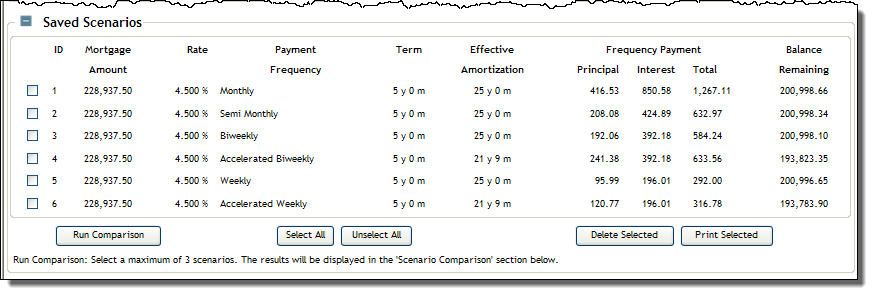
Deleting a Saved Scenario
To delete a saved scenario, select it in the Saved Scenarios section,
and click the Delete Selected
button.
Printing a Saved Scenario
To print a saved scenario, select it in the Saved Scenarios section,
and click the Print Selected button.
Running
Comparisons of Scenarios
You can compare up to three saved scenarios against the selected mortgage
(the selected mortgage is displayed in the Mortgage section on the Scenario
Builder page), complete the following steps:
In the Saved Scenarios
section, select the scenarios you want to compare. You can select
a maximum of three.
Click the Run Comparison
button. The screen refreshes with the Scenario Comparison section
displaying the results.
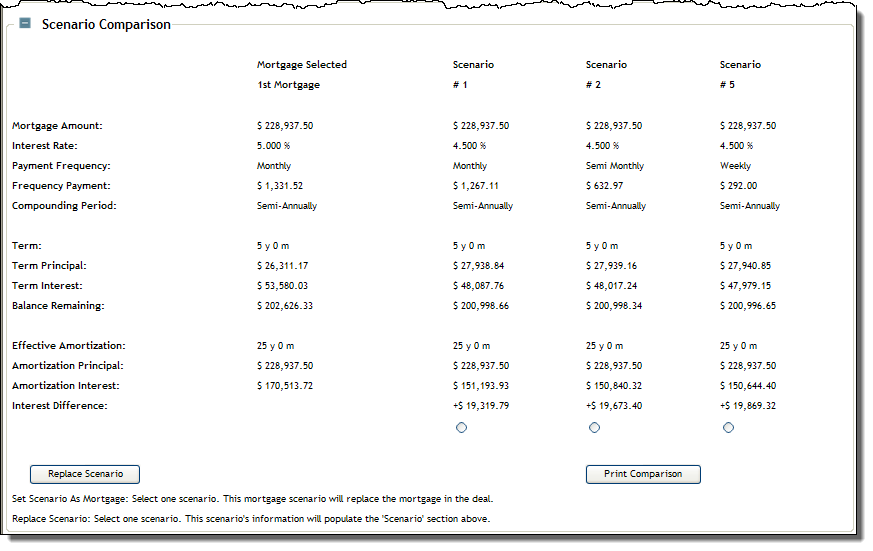
The "Replace Scenario" Feature
A scenario displayed in the Scenario Comparison section can be selected
to populate the Scenario section on the Scenario Builder page. Select
the option button of the desired scenario and click the Replace
Scenario button. The screen refreshes and the Scenario section
displays the details of the scenario.
Printing Comparisons
To print the comparisons displayed in the Scenario Comparison section,
click the Print Comparison button.
A PDF document is generated and opened in a separate window, from which
you can print.
Setting
a Scenario as the Mortgage
A scenario that has been run as a comparison can then be selected to
be set as the new mortgage. Doing so will overwrite the mortgage information
on the Application
Edit screen.
From the Scenario Comparison section, select the scenario that
is to replace the mortgage.
Click the Set Scenario As Mortgage
button. The screen refreshes and the existing mortgage is replaced.