Submitting Documents to Lender's Exchange Site
If your firm does not subscribe to Exchange,
it may be that a Lender to whom you have submitted a mortgage application
does subscribe to Exchange. If so, then you have the ability to fax documents
directly to that Lender’s Exchange site, which saves times and ensures
efficiency for the document transaction process.
Note: If your firm does subscribe
to Exchange, then submitting documents
to a Lender's Exchange site is done within Exchange. Please refer to the
Exchange Help file for more information. Do not attempt to use the instructions
documented below.
Printing
a Fax Cover Sheet for Lender's Exchange Site
How to Fax
Documents to Lender's Exchange Site
Printing
Fax Cover Sheet for Lender's Exchange Site
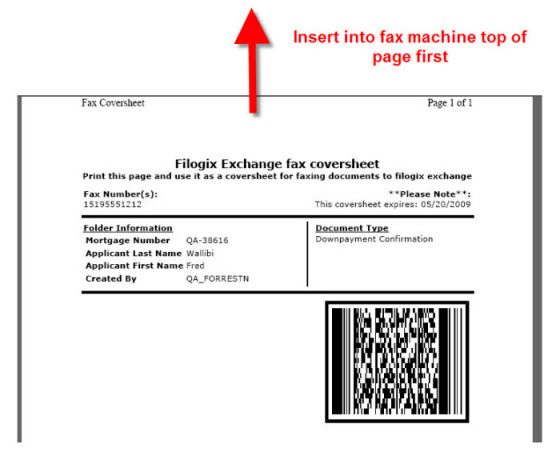
After submitting an application to a Lender who uses Exchange, the Forms screen has an option to print
Exchange fax cover sheets for each document. An Exchange fax cover sheet
contains a bar code that holds all the necessary information to enable
the associated document to be successfully faxed and stored on the Lender’s
Exchange site.
To print an Exchange fax cover sheet for a document, complete the following
steps:
Open the Forms screen by clicking Forms in the Left Navigation
Pane.

Select (check) the Filogix
Exchange option and click its Print
button.
A screen appears providing you with a list of fax
cover sheets that are available to print.
Select (check) the option buttons of the fax cover
sheets you want to print (to print all cover sheets, click the Print All button at the bottom of
the page).
Each document is merged into a larger, single PDF
document, which opens in a separate window, from which you can print
by selecting File >
Print.
Fax the required documents to the Lender as needed,
ensuring that each document is preceded by its associated fax cover
sheet. The fax number can be found on the cover sheet. See "How
to Fax Documents to Lender's Exchange Site" to ensure you are
properly faxing the documents.
When a document is successfully faxed into Exchange,
both you and the Lender receive an e-mail notifying that the document
has been successfully accepted.
How
to Fax Documents to Lender's Exchange Site
For paper documents to be successfully faxed to a lender's Exchange
site, the sender must ensure that he or she properly uses the fax cover
sheets that have been printed for those documents (see above). As such,
the sender must note the following precautions:
Each fax cover sheet must precede its
associated document
A bar code exists on the fax cover sheet that contains the necessary
information for Exchange to properly index and store the associated document.
Therefore if the fax cover sheet does not precede its associated
document, the document will be rejected by Exchange!
Hence, if you are faxing three documents, with a cover sheet for each,
the order would be as follows:
Fax Cover Sheet 1
Document 1
Fax Cover Sheet 2
Document 2
Fax Cover Sheet 3
Document 3
Ensure page orientation (face up or face
down) is correct for the fax machine
Ensure the fax cover sheet and associated document are correctly oriented
according to the fax machine's requirements. This means the pages will
be inserted either face up or face down. If the pages are not properly
oriented, then the document(s) will not be received by Exchange.
A fax cover sheet must be inserted into fax
machine top of the page first!
The bar code on the cover sheet will be read by Exchange and therefore
it is important that the cover sheet is inserted into the fax machine
top of the page first.